Tuesday, March 12, 2013

From Zero to Hero: Cherub - Malifaux Neverborn Minion

Hey you guys,

it's been a while since my last update, but work has been crazy busy. So here's a quick one for you today: The Malifaux Neverborn Cherub Minion.

Apart from Baby Kade, this has to be the smallest figure I painted so far. As I've been using my airbrush for most of the figure, I'm really starting to get better on brush control when painting small areas at a time.

I cleaned and washed the mini, as the mold release agent really can screw up your paintjob. For added stability, I used a pin, which I glued below the pelvis of the figure. It's quite prominent now, but will be camouflaged during the painting process.


I used Vallejos Polyurethane Grey Primer as I wanted to achieve a neutral and muted look on this piece.


The Wings


I basecoated the wings with VMA White.


I then used VGA Sombre Grey for the lowest part if the wings and then added VMC Ivory for the upper sections. The mixes I used where 1:1 and then 3:1 Ivory to Grey.


When I was done I used a light drybrush of VMC Ivory to bring out the details of the wings and then used Vallejos Polyurethane Gloss Varnish to seal the paintjob, preparing for an oil wash later.


The Body


I basecoated the skin with VGC Dwarf Skin, adding lots of thinner to achieve a translucent mix, which I applied 2-3 coats. The mix was about 5 parts thinner to 1 part paint.


I used the same thin mixture of VGC Cadmium Skin and concentrated on the raised areas of the model. I took care of leaving the darker color in the recesses, for a nice shading effect.


For the extreme highlights, I used the same 5:1 mix of VMC Basic skin, applying it only to the areas the light would hit most, like the pot belly, buttocks and top of the head.


I then used some ground up violet artist pastels and applied it to the darkest shadows of the skin to create some visual interest in these areas. I also locked in the eyes, as at this stage I could fix any mistakes without ruining the rest of the paintjob.


I tried VMC Black as the color for the loincloth, but found the contrast to stark for this model. So I painted over this with VGC Sombre Grey, leaving some Black in the darkest recesses. I also locked in the rest of the details on the model, like the eyebrows and bow.


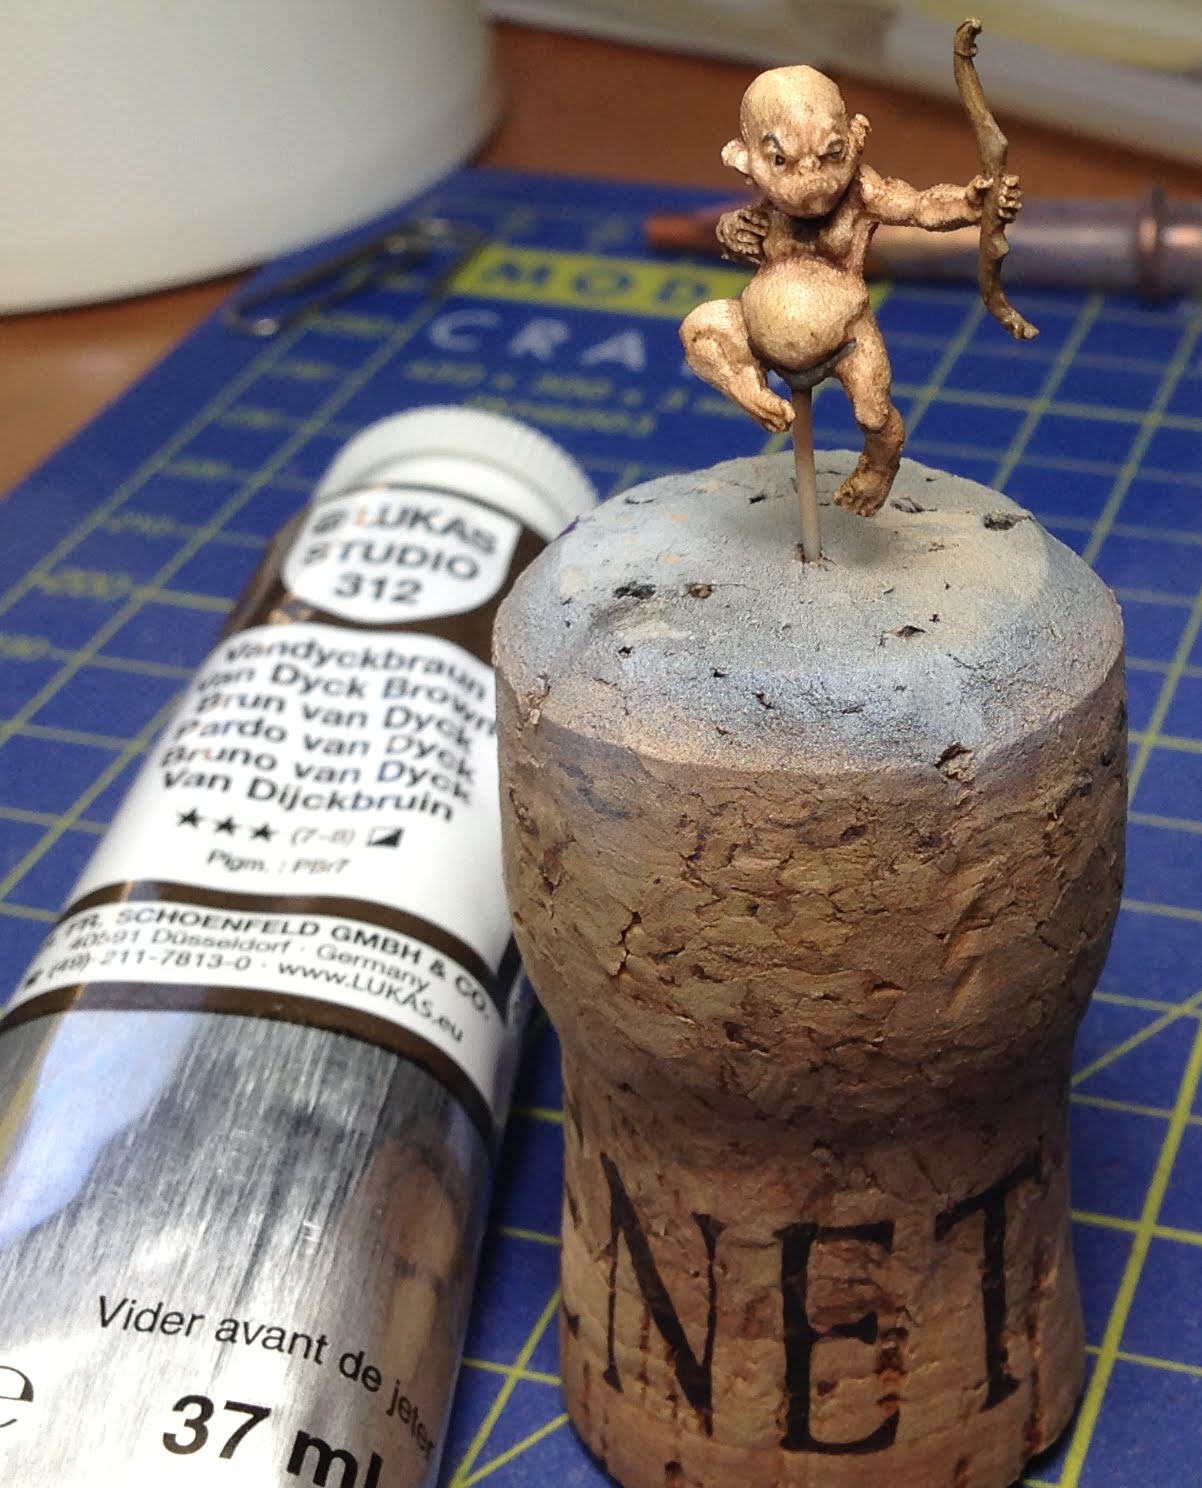
I made a thin oil wash with Van Dyke Brown and applied it liberally to the whole body and wings.


When the oil wash was dry, I used mineral spirits to clean the model, but took care not to remove too much of the wash, as I wanted the figure to have a dirty and grungy look.


For the base I used the same techniques as I've used on the rest of my Malifax Neverborn Crew. I also painted the pink black, which made i blend in more with the rest of the model and camouflaged it nicely.

I hope you enjoyed this small step-by-step as much as I enjoyed painting this figure.

Cheers,


IK-Painter

Monday, February 4, 2013

Product review: Ironhalo base inserts

Hey guys,

haven't done a review in quite a while and I have good things to say about the base inserts from ironhalo.net.

Check it out:


Cheers!

Saturday, January 26, 2013

From Zero to Hero: Weaver Widow - Malifaux Neverborn Minion

Hey guys,

unfortunately I've lost some pics of the Weaver Widow tutorial due to some HDD existence failure - but oh well, I hope you'll take something from it. And a small tip from me: always back up your data. I can't stress this enough. At least mirror all important files two times locally (on separate external drives) and once online. Then you can rest assured if something happens, you won't lose it all.

But onto the widow, one of the creepier sculpts I've seen so far in the world of Malifaux.

1. The prep

I started out using my Dremel to shave the contours of the shape of the dress of the mini into a premade resin base, so that it would be flush with the surface. For this, I used a sanding tool. which came with the Dremel set I purchased.


Easy and steady is the trick here, not to take to much off in one go. When I was satisfied with the fit I moved on.


For a secure fit, I used three pins in the bottom of the mini, so it would sit nice and safe.


I again used the Dremel to widen the holes for the arms, so that I could add some green stuff when I would assemble the mini.


I then mounted all the parts and got ready for painting.


2. The painting

I started out by priming the mini with Vallejos Polyurethane Grey Primer, as I wanted a neutral tone for my mini.


For the next steps, I made a small clip from the videos I could save:


As for the next steps:

I basecoated the skin areas with black for a high contrast.


Then I painted the borders of the dress with a 1:1 mix of VGC Squid Pink and VGC Hexed Lichen.


The small accents on the dress where painted with VMV Ivory and the whole mini was given an oil wash with a very light grey, to bring out the details without toning the model down too much.


And now for some final shots of the model:


The painting on this one was very fun, but the assembly was a pain in the butt - the arms I only got on by using a combination of green stuff and superglue, so you can imagine how difficult it was.

For a final touch, I varnished the model with Matte Varnish and then gave the skin areas a coat of Satin Varnish, to make them appear chitin like.

I hope you like it,

Cheers!

Friday, January 18, 2013

From Zero to Hero: Daydreams - Malifaux Neverborn Minions

Hey guys,

today I wanted to show you a simple way to paint the Neverborn Daydreams. I opted for an easy RGB color scheme, as that would really make them pop.

I started out priming them with Vallejo Polyurethane Grey Primer, as that would give the colors more vibrancy as when I would've used black primer.


I laid down the basecoats with my Infinity 2 in 1 CRPlus airbrush, using VGC Imperial Blue, VMA Red and VMA Olive Green


I highlighted the figures with VGC Ice Blue, VGC Orange Fire and VGC Sick Green.


For a nice contrast on the dunce cap, I masked of the figure and laid down a coat of VMA White, followed by two coats of VGC Sun Yellow.


The mouths were painted using a 2:1 mix of VMA Black and VGC Bloody Red, thinning the mix to almost a wash consistency, so it would flow nicely into the hard to reach areas. The tongue was painted with a 1:1 mix of VGC Squid Pink and VGC Bloody Red and shaded with the same mix I used on the mouths.


For added contrast, I painted the eyes on each model to stand out from the basecoat I used. Here I used VGC Scorpion Green, VGC Hexed Lichen and VGC Bloody Red.


The highlights of the eyes where done with VMC White, VGC Squid Pink and VMC Orange.


I decided to paint the bases and base inlays separately, as I want to achieve a more sombre town on the inlays and a more vibrant tone on the bases themselves.


Finally, I painted some details on the models, and glued them to the bases.

So there you have it, a really nice and easy paintjob which really helps to make these figures pop out on the table.

Tell me what you think. :-)

Cheers,


IK-Painter

Tuesday, December 25, 2012

Christmas came just right - Happy Holidays to you all!

Merry Christmas, you guys!

I hope you're having a great time with your families :-)

As for me, the Christkind was very kind this year and brought me something for my hobby:

The Vallejo Model Air Set, which comes in a really snazzy case.


I can't wait to try these paints out and will share my experiences with them. Especially the range of greens and browns is really impressive - and will come in really handy, when I'm painting my Malifaux Alps.

Cheers,


IK-Painter